How To Add Smart Floating Social Share Bar To Blogger And WordPress
I have already post regarding floating social share buttons in my previous post How to Add Floating Social Share Button To Blogger / WordPress. In the previous post I show you how to add simple social share bar buttons. In the previous post, I have also shown it in differed ways.
But smart floating social share buttons gives an extraordinary look of your blog as well as it locates extremely left side of your blog. But in this post, I teach you how to add Smart Floating Social Bar buttons extremely left side of your blog.
Social share buttons help bloggers or website owners to share their online contents on social networking sites like Facebook, Twitter, Google+, LinkedIn, Pinterest etc. You can add floating social share buttons either left side or right side to your blog. But the best position is left side. You can add social share buttons just after end of the each blog post also.
There are many ways to add social share button to your blog / websites. No matter where your blog is hosted. You can easily add this widget to your blog.
I have seen smart floating social share bar in many blogs or websites. But by default all have only five buttons to share your blogs. But I have customize the code for ten social share buttons. You can see my blog and other blogs. You will see the difference.
This trick is very simple. No programming knowledge is required. This process works on both blogger and wordpress blog. Like my previous tricks you can also customize this gadget for a certain limit.
You can add this gadget to your blogger / wordpress blog in two ways. Here I will show you both process.
Process 1.
This is the copy and paste process. There are some codes below which are taken from AddThis. In this process you just need to copy the below codes first.
<!-- AddThis Smart Layers BEGIN -->
<!-- Go to http://www.addthis.com/ to customize -->
var addthis_product = 'blg-1.0';
addthis.layers({
'theme' : 'transparent',
'share' : {
'position' : 'left',
'numPreferredServices' : 10
},
'follow' : {
'services' : [
{'service': 'facebook', 'id': 'maniruddinmansuri'},
{'service': 'twitter', 'id': 'maniruddi'},
{'service': 'linkedin', 'id': 'ManiruddinMansuri'},
{'service': 'google_follow', 'id': '+ManiruddinMansuri1'},
{'service': 'pinterest', 'id': 'maniruddin'},
{'service': 'tumblr', 'id': 'maniruddin'},
{'service': 'youtube', 'id': 'mcomindia'}
]
},
'whatsnext' : {},
'recommended' : {}
});
</script>
<!-- AddThis Smart Layers END -->
Step 5. After that paste the above copied code inside the Content box. see the below image.
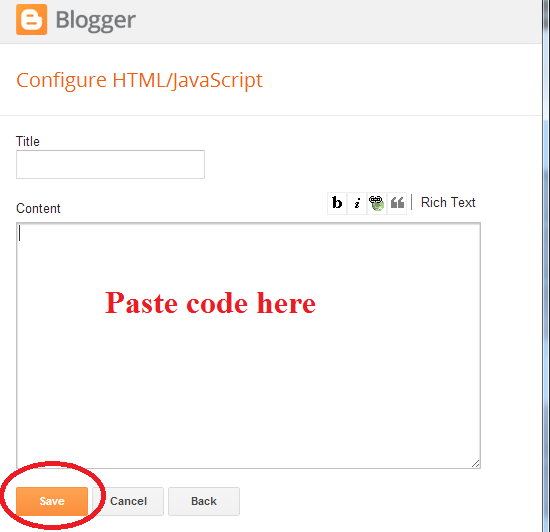
Step 6. After pasting the code click Save
Step 7. Click Save arrangement
You have done for blogger. Click View blog. Now you will able to see the smart floating social share bar extremely left side of your blog.
How to add to WordPress
Step 1. First Login to your wordpress account
Step 2. Go to Widgets
Step 3. Select a Text widget
Step 4. And now paste the above code to the text widget.
Step 5. Click Save to save the widget.
Process 2
But smart floating social share buttons gives an extraordinary look of your blog as well as it locates extremely left side of your blog. But in this post, I teach you how to add Smart Floating Social Bar buttons extremely left side of your blog.
Social share buttons help bloggers or website owners to share their online contents on social networking sites like Facebook, Twitter, Google+, LinkedIn, Pinterest etc. You can add floating social share buttons either left side or right side to your blog. But the best position is left side. You can add social share buttons just after end of the each blog post also.
There are many ways to add social share button to your blog / websites. No matter where your blog is hosted. You can easily add this widget to your blog.
This trick is very simple. No programming knowledge is required. This process works on both blogger and wordpress blog. Like my previous tricks you can also customize this gadget for a certain limit.
You can add this gadget to your blogger / wordpress blog in two ways. Here I will show you both process.
Process 1.
This is the copy and paste process. There are some codes below which are taken from AddThis. In this process you just need to copy the below codes first.
<!-- AddThis Smart Layers BEGIN -->
<!-- Go to http://www.addthis.com/ to customize -->
<script type="text/javascript" src="//s7.addthis.com/js/300/addthis_widget.js#pubid=xa-532001536456a2bc"></script>
<script type="text/javascript">var addthis_product = 'blg-1.0';
addthis.layers({
'theme' : 'transparent',
'share' : {
'position' : 'left',
'numPreferredServices' : 10
},
'follow' : {
'services' : [
{'service': 'facebook', 'id': 'maniruddinmansuri'},
{'service': 'twitter', 'id': 'maniruddi'},
{'service': 'linkedin', 'id': 'ManiruddinMansuri'},
{'service': 'google_follow', 'id': '+ManiruddinMansuri1'},
{'service': 'pinterest', 'id': 'maniruddin'},
{'service': 'tumblr', 'id': 'maniruddin'},
{'service': 'youtube', 'id': 'mcomindia'}
]
},
'whatsnext' : {},
'recommended' : {}
});
</script>
<!-- AddThis Smart Layers END -->
<div style="clear: both;font-size: 9px;text-align:center;"><a style="color: #3399BB;" href="http://www.manidin.com/2014/03/AddSmartFloatingSocialShareBar.html/">Get This Widget</a>
How to add to blogger
Step 1. Login to your blogger account
Step 2. Click Layout which is located left side
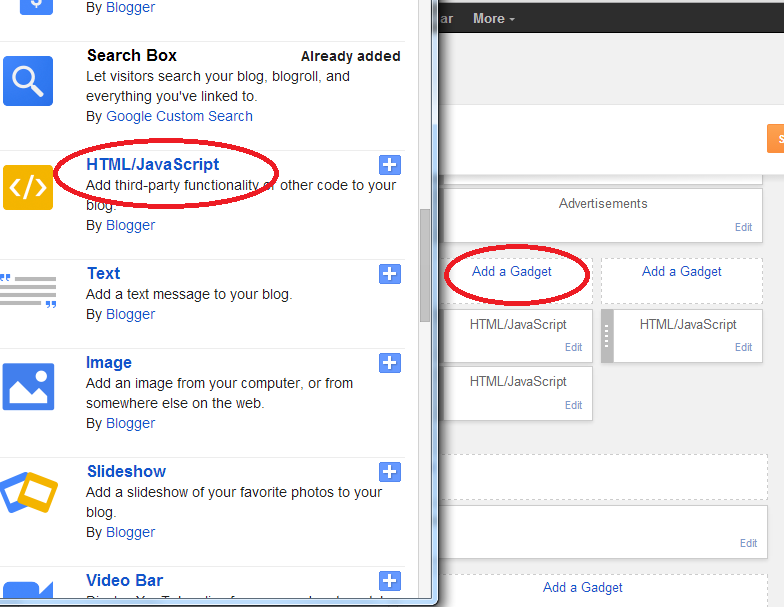
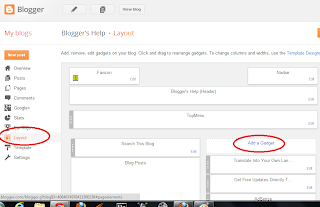
Step 3. Click Add a Gadget
Step 4. Scroll down and select HTML/JavaScript from Popup Window
</div>
After copying the above codes you need to do the following steps for blogger and wordpress.How to add to blogger
Step 1. Login to your blogger account
Step 2. Click Layout which is located left side
Step 3. Click Add a Gadget

Step 4. Scroll down and select HTML/JavaScript from Popup Window

Step 5. After that paste the above copied code inside the Content box. see the below image.

Step 6. After pasting the code click Save
Step 7. Click Save arrangement
You have done for blogger. Click View blog. Now you will able to see the smart floating social share bar extremely left side of your blog.
Watch this video
How to add to WordPress
Step 1. First Login to your wordpress account
Step 2. Go to Widgets
Step 3. Select a Text widget
Step 4. And now paste the above code to the text widget.
Step 5. Click Save to save the widget.
Process 2
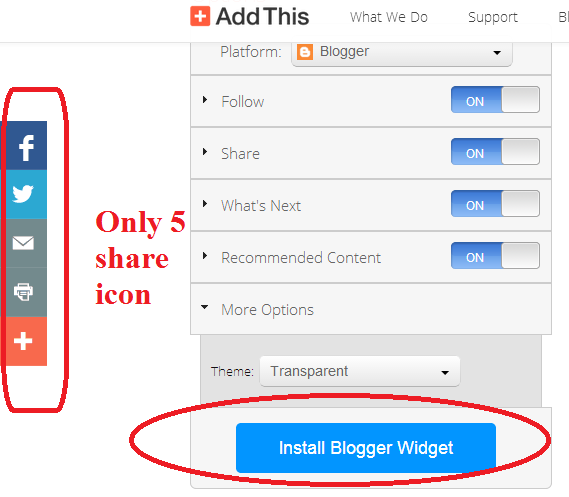
In the second process you need to go to http://www.addthis.com/ and after providing your facebook, twitter, google+, linkedin profile address click Install Blogger Widget. If you select platform WordPress then you see Install WordPress Plugin. Once you click Install Blogger Widget add page element window opens.

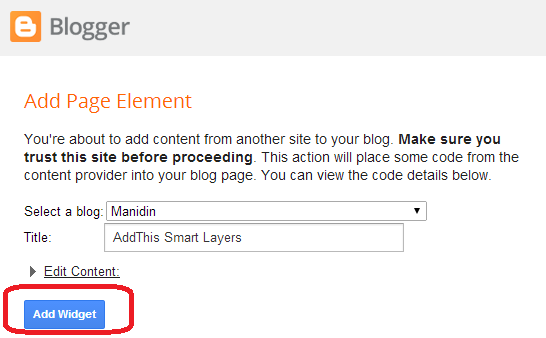
On the add page element window you need to click Add Widget. If you are not login to your blogger or wordpress account before doing this process, it asks for login. Once you login to your account the gadget will be installed.

Was this information is helpful? If you think this information may help others then share it on social media. Your one share appreciate me lot.
0 comments:
Post a Comment
Thanks For Your Feedback